Discovering the full potential of your high-tech rangefinder can elevate your experience, whether you’re on the golf course or out in the wilderness. This guide is designed to help you unlock all the features and functionalities that your device offers, ensuring you get the most accurate measurements and enhance your overall performance.
From setting up your device to understanding its diverse modes and advanced features, this comprehensive guide provides step-by-step instructions to help you navigate your rangefinder with ease. Learn how to calibrate for different terrains, adjust settings for various weather conditions, and use the built-in technology to its fullest extent.
Understanding the nuances of your device will give you an edge, allowing for more precise readings and ultimately, more success in your outdoor endeavors. Get ready to explore the many capabilities of your rangefinder and see how it can transform the way you play and explore.
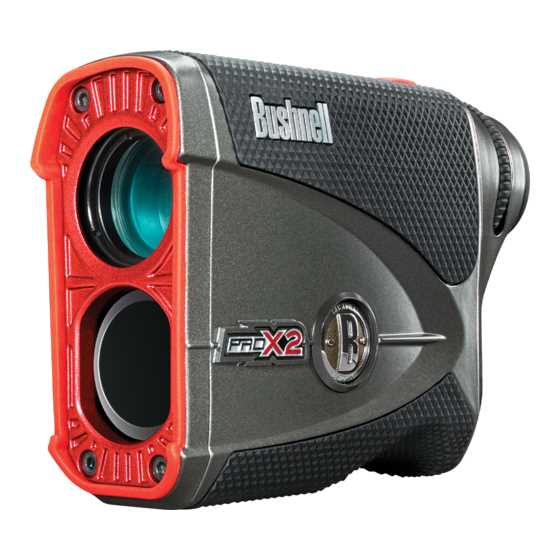
Overview of the Bushnell Pro X2 Features

The X2 rangefinder is designed for those who seek precision and versatility in their outdoor adventures. With a focus on enhancing the user’s experience, it combines advanced technology with intuitive functionality to provide reliable measurements in various environments. Let’s explore the key features that make this device stand out in the market of laser rangefinders.
Dual Display Technology: The X2 rangefinder offers Dual Display Technology (DDT), allowing users to easily switch between bright red or crisp black display settings based on lighting conditions. This adaptability ensures maximum visibility, whether in bright sunlight or overcast skies, giving users a clear readout in any situation.
PinSeeker with JOLT Technology: Equipped with PinSeeker with JOLT, this feature helps to lock onto the target with greater accuracy. When the rangefinder detects the flagstick, it provides a short vibrating burst, confirming that the target is acquired. This technology is especially useful for gauging distances on the golf course, making sure users are confident with their club selection.
Waterproof Construction: Built to withstand various weather conditions, the X2 rangefinder features a fully waterproof design. This durable construction means it can handle rain or shine, ensuring reliability regardless of the elements. Outdoor enthusiasts can depend on its performance in wet and rugged environments.
Slope-Switch Technology: The device incorporates Slope-Switch Technology, which allows the user to toggle the slope compensation on and off. This feature provides the advantage of calculating adjusted yardages on uneven terrain, offering critical information for precise shots. When slope calculation is not permitted, users can quickly disable the feature, keeping the device tournament legal.
Each of these features is crafted to provide a competitive edge in various scenarios, making the X2 rangefinder a powerful tool for accuracy and convenience. Whether in sporting events or other activities requiring precise distance measurement, its array of technologies ensures a high level of performance.
How to Set Up Your Bushnell Pro X2
Setting up your new rangefinder is an essential step to ensure you’re getting the most accurate measurements possible. This guide will walk you through the initial configuration and provide tips on optimizing the device for various outdoor conditions. Follow these steps to customize the tool to your specific needs and preferences.
Unboxing and Initial Setup

Start by carefully unboxing your rangefinder. Ensure all components are included, such as the device, battery, and carrying case. Insert the battery according to the markings inside the battery compartment. Power on the device by pressing the power button. The display should light up, indicating the unit is ready for further configuration.
Adjusting Settings for Optimal Performance
Once powered on, you can access the settings menu by holding down the mode button. Use the navigation buttons to scroll through various options such as measurement units, slope functionality, and brightness levels. Adjust these settings to match your personal preferences and the specific requirements of your environment. Remember to save any changes before exiting the menu.
| Setting | Options | Description |
|---|---|---|
| Measurement Units | Yards, Meters | Select between yards or meters for distance measurements. |
| Slope Functionality | On, Off | Toggle the slope feature to measure adjusted distances accounting for elevation changes. |
| Brightness | Low, Medium, High | Adjust the display brightness to suit different lighting conditions. |
After completing these steps, your rangefinder should be fully set up and ready to use. Familiarize yourself with its functions by testing it in various environments to see how it responds. Regularly check the battery and settings to ensure consistent performance over time.
Understanding the Bushnell Pro X2 Display

The display of this advanced rangefinder is designed to provide golfers with clear and precise information, allowing for better decision-making on the course. Its user-friendly interface ensures that essential data is easily accessible, enhancing the overall experience and helping users achieve more accurate shots. By understanding how to read and interpret the various indicators and metrics shown, you can fully leverage the device’s capabilities.
At the core of the display are several key elements that deliver critical information about distance, slope adjustments, and target acquisition. Each component is strategically placed to ensure quick readability, even in varying light conditions. The dual display technology allows you to switch between different visual modes, optimizing visibility based on your environment. Mastering these features is essential for maximizing performance and confidence in every shot.
Additionally, the display includes a range of customizable settings, allowing you to adjust brightness and units of measurement according to your preference. Understanding how to navigate and personalize these settings will ensure that the device meets your specific needs, providing a tailored experience for every round of golf. Learning to interpret the feedback from the display will not only improve your game but also make the use of the device more intuitive and enjoyable.
Optimizing Accuracy with Your Pro X2
Achieving precise measurements with your device requires understanding its capabilities and making adjustments based on your environment. By mastering the tool’s features and knowing how to adapt to different conditions, you can enhance your accuracy and reliability during use.
To start, make sure to calibrate your device regularly. This ensures that the readings are consistent and reliable. Refer to the device’s settings menu to find the calibration option and follow the steps provided. Regular calibration is essential, especially after traveling or experiencing significant temperature changes.
Another key factor in optimizing performance is understanding how different terrain and weather conditions can impact accuracy. For instance, using the device on a foggy day or in areas with heavy foliage may require switching to a mode that compensates for these challenges. Familiarize yourself with all available modes and their specific uses to choose the right one for each situation.
Additionally, proper handling of the device can significantly influence accuracy. Always maintain a steady hand when taking measurements, and use both hands if necessary to stabilize the device. If your device has a tripod mount, consider using a tripod for even greater stability, especially when working at longer distances.
Finally, take the time to learn and practice using advanced features such as angle compensation and target locking. These features can dramatically improve your results by accounting for slopes and isolating the intended target from background distractions. Regular practice will ensure you are comfortable using these features when precision is most critical.
By incorporating these techniques into your routine, you will optimize the accuracy and performance of your device, ensuring reliable and precise measurements every time.
Battery Maintenance and Replacement Tips

Proper care and timely replacement of batteries are essential for ensuring the longevity and optimal performance of your electronic device. Following some simple guidelines can help you avoid unexpected power failures and maintain your device in excellent working condition.
- Always use high-quality batteries from reputable brands to prevent leaks and ensure consistent power output.
- Regularly check the battery compartment for signs of corrosion or leakage, which can damage the device and reduce its lifespan.
- Store your device in a cool, dry place when not in use to prevent the batteries from draining quickly due to high temperatures or humidity.
If your device uses rechargeable batteries, there are additional steps you should take to maintain their efficiency:
- Charge the batteries fully before using the device for the first time, as this can help condition them for better long-term performance.
- Avoid overcharging by unplugging the charger once the batteries are fully charged, which can prevent overheating and extend battery life.
- Use the device until the batteries are nearly depleted before recharging, but avoid completely draining them, as this can negatively impact battery health over time.
When it’s time to replace the batteries, follow these tips to ensure a smooth process:
- Turn off the device before removing old batteries to prevent any damage or accidental data loss.
- Use a soft cloth to clean the battery contacts inside the compartment to ensure a good connection with the new batteries.
- Insert the new batteries according to the polarity markings to avoid potential damage to the device or batteries.
By adhering to these maintenance and replacement tips, you can enhance the durability of your device and make the most of its battery life.
Troubleshooting Common Pro X2 Issues
Encountering issues with your rangefinder can be frustrating, but many problems are often easy to resolve with some basic troubleshooting. This section provides guidance on identifying and addressing frequent challenges users face, ensuring your device operates smoothly and effectively.
If the device fails to power on, first check if the batteries are correctly installed and sufficiently charged. Replace them with new batteries if necessary, ensuring they are oriented correctly according to the markings in the battery compartment.
For issues with inaccurate measurements, verify that the rangefinder’s lens is clean and free of obstructions. Dirt or smudges can affect the device’s performance. Gently clean the lens with a soft, dry cloth to improve accuracy.
If you experience difficulty with the display or if it appears faint, adjusting the contrast settings might help. Refer to the device’s settings menu to modify the display contrast to a more suitable level for your environment.
In cases where the device seems to be unresponsive or behaves erratically, performing a reset can often resolve the issue. Consult the device’s settings or user interface for options to reset to factory defaults.
Should you continue to experience problems despite these steps, it may be necessary to consult with customer support for further assistance or potential repairs. Regular maintenance and proper care can prevent many common issues and ensure optimal performance.